It is possible to add your company logo or corporate logo to all non-prescribed forms, giving your forms a more professional look. To setup this feature you must first have a logo file of either .gif or .jpg format (the .gif format is better for reproduction of logos). You may need to consult with your graphic designer to obtain such a file.
1. |
Open ADLForms
|
2. |
Click on <Options> from within the ADLForms Main Menu
|
3. |
Select the 'Headers/Footers & Logos' tab
|
4. |
Choose the Logo option you prefer from the 'Header/Footer Type' menu
Once selected it will enable you to use the 'Header/Footer Logo' fields
|
5. |
Within the 'Header Logo File' and 'Footer Logo File' boxes, type the name and location of the logo file to be used into the 'Logo File' field or click on the browse button (<....>) to the right of the field to browse for the file required
|
6. |
Using the 'Position' menu, select where you want the logo to appear on the form
|
7. |
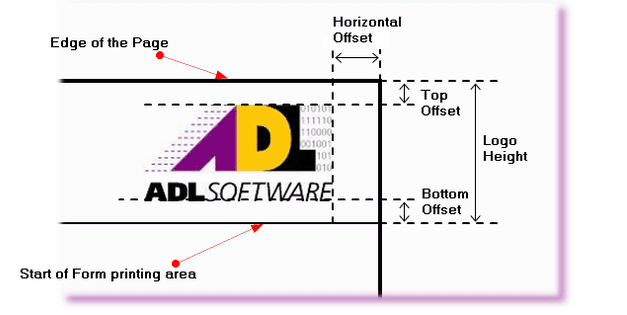
Type in the size of the 'Height' and 'Offsets' required to fit your company logo, as shown below
If you choose an option that includes Letterheads, follow the instructions for Printing To Letterheads
Note: You can insert negative figures into the 'Top Offset' field for 'Footers' to bring the image closer to the form and into the 'Bottom Offset' field for 'Headers' to bring the image closer to the form. This allows for images that have a blank border already
|
8. |
Click <Save>
|
9. |
Click on the <Exit> button to return to the ADLForms Main Menu
|
